|
Product Description Smart Sensor Paint Coating Thickness Gauge Meter Tester Built-in Probe,Automotive Coating Refinishing Paint Meter (0~1500um)
Product Specification:
Features: 1. More widely measuring range: 0-1700um
2. Both with zero point calibration and multi-point calibration
3. Automatically identify sustrate material and display on the LCD
4. Large screen, and with max 20 store data
5. Statistics display: Max, Min, Avg
6. Button is simple, easy to operate, one-hand operation
7. Convenient automatic calibration function
8. Automatic correction function to prevent misuse calibration
9. Dynamically adapt to environmental features
10. V shaped groove suitable for measurements on cylindrical parts
11. Specail probe structure comes with better stability
12. “Beep†sound when measurement or calibration is completed
13. 180 degree flip for easy read data with top surface | Product Name | Digital Paint Coating Thickness | | Measurement range: | 0~1700um, 0~67.8 mils | | Accuracy: | ± (2um+3%H), H-standard coating thickness | | Resolution | 0.1μm / 1μm | | Measuring Principle | Magnetic Induction & Eddy current | | Probe: | built-in probe | | Power supply: | 2 x 1.5V AAA battery (not include due to air limit) | | Body size: | 96 x 50 x 25mm | | Product weight: | 41g | | Storage temperature: | 10~60C | | Operating Condition | 0℃~50℃(without strong magnetic) | | Data Storage | 20 groups | | Backlight Display / Battery Indication / Data Analysis | V | | Zero / Two Poin / Basic correction /Alarm Buzzer | V | | Single / Continuous / Standard Deviation Measurement | V | | Max & Min Measuring / AVG & DFR Measuring | V | | Data Storage & Recall / Metric / Imperial Switchable | V | | Restore Factory Setting | | Restore factory setting also called initialization. In standby or measuring mode, continues press†‘ key, the instrument will go to restore factory operation when screen show†000″, then †000,Fe,Nfe, cal†and buzzer, keep press the key of ††for a while till all the character has been display on the screen, it means that the restore factory setting operation has been finished, at the same time, the historical data and the calibration value also has been cleared Note1:
In the whole process, we need to always keep pressing the key†“, if you don’t keep pressing the ††key all the time during the whole process, please to make sure to redo the whole process again Note 2:
Please ensure the instrument probe is not touched with any object when you doing the restore operate( the proble dangling) | 
| Calibration | | The device with 2 kinds of calibration mode, both are very convenient, for different customers accoring to their own application to choose |  | 1. Standard Calibration
Basic instruction: In the standby model or measuring mode, long press†MENU†key to enter the film standard calibratoin status, when the display will show†CAL†icon,(the first screen will show of †0.0 cal†zero film calibration status), then there are 5 different calibration status, press††or ††to switch, Five kinds of film calibration status will be display, Detail information calibration status will be display. Detail informatin as below
Calibration operate:
Firstly, Long press’ menu†to enter to the film calibration interface, then select the corresponding calibration model of 0.0/50/100/250/500, via short press key ††/ ††, then put the device on the corresponding film, vertically press the device probe on the film, and better to repeat pressing 2 or 3 times, every time of the calibration interval should be keep for several seconds and left the proble a little far from the substrate to ensure the accuracy.
The calibration operation can be repeated until it meets your desire
Exit the calibration:
when calibratoin has complete, short press’ MNU†to exit the calibration status, then it will show us to the measuring status
Note: it is import that measuring the standard film thisckness with corresponding film calibration status. so when you find that you run this instrument calibration with mistake and some errors information shows on display, we recommend to do the restore of factory operate
2. Multi-point calibration | 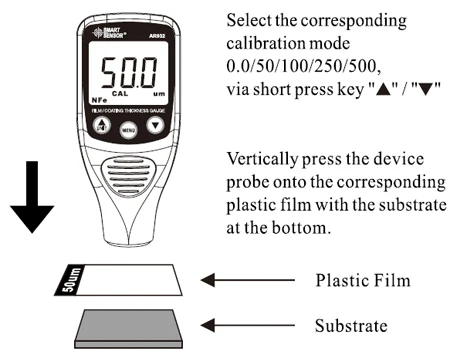 | 2. Multi-point calibration
When you have a standard shim which differernt with ours, firstly measure the shim on the Fe or NFe substrate, then get the in initial value, then lift the instrument, long press††into the multi-point calibratoin interface, the screen shows†CALâ€. Ath this point, then short press††or ††can adjust the measurement value and the long press††or ††to speed up the adjustment of 10 times, When you got the right data, then short press†MENU†key to exit, ort directly to measuring the film, the calibration has been finished. | 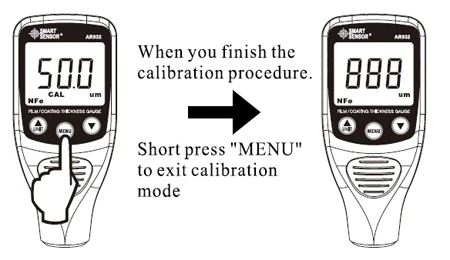 |
|


